
Look up in your living room. Where the wall meets the ceiling, what do you see? In many Indian homes, the answer is a bare, sharp line. It works, but it feels unfinished. A well-planned cornice design fixes that. It frames the ceiling the way a border frames a saree. This guide explains what a cornice is and which styles suit which rooms. You will also find costs, materials, lighting tips, and mistakes to avoid.
What Is a Cornice and Why Does It Matter
A cornice is a decorative moulding that runs along the top of a wall. It covers the joint between the wall and the ceiling. Builders in ancient Greece used it to throw rainwater away from walls. Today it plays a quieter role indoors.
Good cornice design does three jobs at once.
- It hides hairline cracks at the wall and ceiling joint.
- It softens the hard ninety degree corner.
- It adds depth, so the room looks complete.
The first job matters most in India. Concrete expands in summer and shrinks in winter. The joint moves a little each season, and a cornice masks that movement.
Foreign designers call the same element crown moulding. In Indian homes, you will hear the word cornice, and POP or gypsum versions dominate.
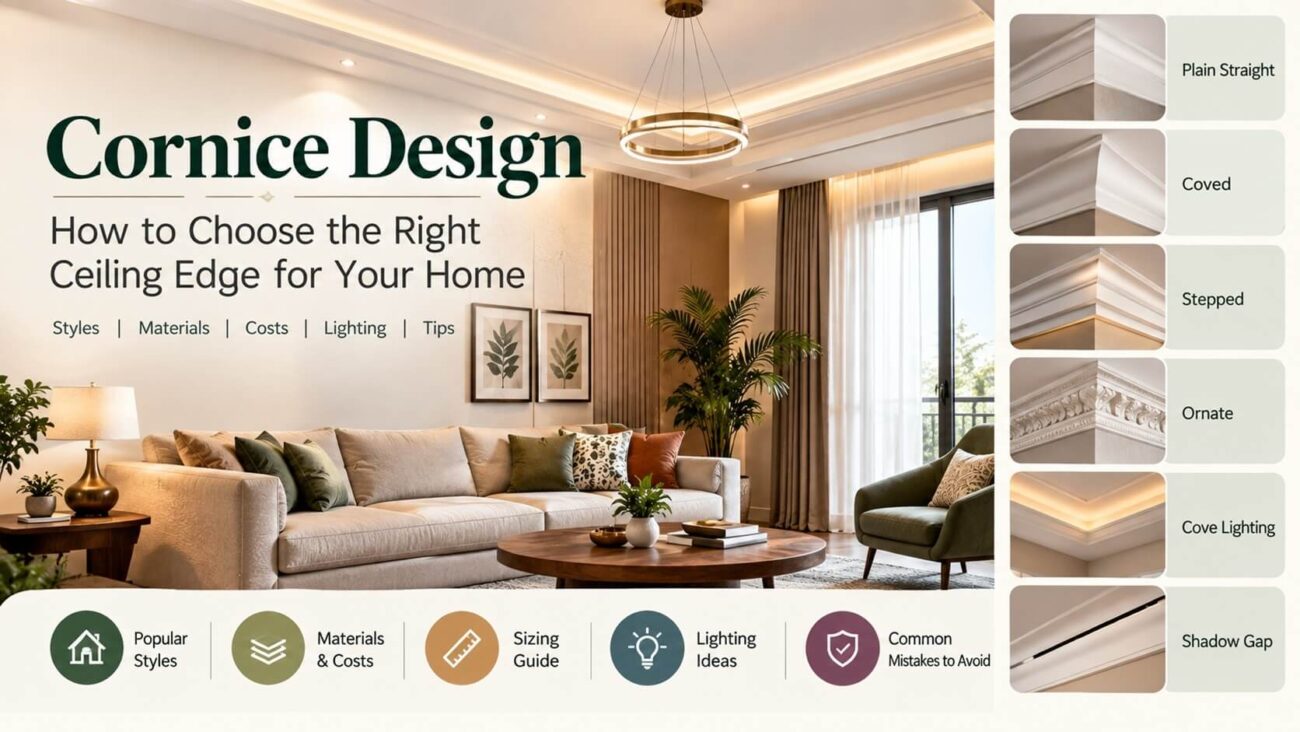
Popular Cornice Design Styles for Indian Homes

Each style creates a different mood. Pick one that matches your furniture and your ceiling height.
Plain Straight Profile
This is a flat or slightly angled band. It suits modern and minimal homes. It also costs the least.
Coved Profile
A cove curves gently from wall to ceiling. It leaves a soft shadow line. Bedrooms look calmer with it.
Stepped Profile
Two or three steps create rich depth. This cornice design suits formal living rooms and dining areas.
Classic Ornate Profile
Leaf patterns, dentil blocks, and egg and dart motifs come from Georgian homes. They need ceilings of ten feet or more. Otherwise, they crowd the room.
Cove Lighting Profile
Here the cornice hides an LED strip. Light bounces off the ceiling and glows softly. Many new apartments use this cornice design for evening warmth.
Shadow Gap Profile
A thin recessed channel replaces the moulding. The ceiling seems to float. This look needs precise workmanship, so hire a skilled team.
| Style | Best Room | Ideal Ceiling Height | Mood |
|---|---|---|---|
| Plain straight | Study, kids room | 8 to 9 ft | Clean, modern |
| Coved | Bedroom | 8 to 10 ft | Soft, calm |
| Stepped | Living, dining | 9 to 11 ft | Rich, formal |
| Ornate | Large hall | 10 ft and above | Classic, grand |
| Cove lighting | Living, bedroom | 9 ft and above | Warm, layered |
| Shadow gap | Modern living area | 9 ft and above | Floating, sleek |
Materials Used for Cornice Design
Material changes the cost, the finish, and the lifespan. Here is a simple comparison.
| Material | Approx. Cost per Running Foot | Main Strength | Weak Point |
|---|---|---|---|
| POP | Rs 40 to Rs 120 | Easy to shape, smooth finish | Cracks with moisture and movement |
| Gypsum | Rs 80 to Rs 200 | Neat, factory made profiles | Joints need careful filling |
| Polyurethane | Rs 150 to Rs 400 | Light and moisture resistant | Costlier, needs skilled fixing |
| PVC | Rs 60 to Rs 150 | Waterproof | Limited pattern choice |
| Wood | Rs 250 and above | Rich, warm look | Needs polish and termite care |
These are indicative ranges only. Rates vary by city, profile, and contractor. Collect two or three quotes before you decide.
Here is a question most homeowners forget. Ask your contractor how they will treat the joint. A flexible sealant at the wall junction prevents many future cracks.
How to Size Your Cornice Design Correctly
Size is where most homes go wrong. A tiny cornice looks like an afterthought. A huge one swallows the room.
Many designers follow a simple height guide.
| Ceiling Height | Cornice Drop on Wall |
|---|---|
| 8 ft | 3 to 4 inches |
| 9 ft | 4 to 5 inches |
| 10 ft | 5 to 7 inches |
| 11 ft and above | 6 to 9 inches |
Now for a detail most guides skip. Drop and spread do different things. A deeper drop on the wall makes the ceiling feel lower and cosier. A wider spread on the ceiling makes the room feel taller. So, a compact room with a low ceiling needs a cornice that spreads more than it drops. Try the paper strip test before you order anything. Cut a strip to your planned height. Tape it along the wall. Then sit on your sofa and look up.
This costs nothing. It also saves a lot of regret.
Colour and Lighting for Your Cornice
Colour decides whether the cornice whispers or speaks.
- Paint it the same shade as the ceiling for a subtle look. Choose a contrast shade for drama. A thin gold or silver line adds a festive touch.
- Pick the cornice tone after you finalise the flooring. A cool white tile can clash with a creamy cornice. Our vitrified tiles guide explains finishes and shades in detail.
- Lighting needs equal thought. If you choose a cove lighting profile, leave a recess of four to six inches. The strip then stays hidden from view.
- Pick warm white LEDs between 2700K and 3000K. Cool white strips make a bedroom feel like a clinic.
- Add a dimmer as well. You will use it more than you expect.
Cornice Design Ideas Room by Room
Every room has its own rhythm. Match the profile to how you use the space.
- Living room: Choose a stepped or cove lighting profile. These suit evening gatherings. Our living room decor ideas will help you plan furniture and colours around it.
- Bedroom: A coved profile with warm light feels restful. Keep the colour soft and close to the ceiling shade.
- Dining room: A stepped profile frames a pendant light well. It also gives guests something pleasant to notice.
- Kids room: Pick a plain straight profile. It stays easy to clean and easy to repaint.
- Pooja room: Keep it light and simple. Many Vastu followers prefer plain, light ceilings and avoid heavy dark edges. You can read more in our Vastu tips for home.
- Passage and balcony entry: A shadow gap profile keeps lines clean. If you are redoing the balcony too, pair it with a modern glass balcony railing design.
Pairing Cornices with Wall Treatments and Decor
A cornice never works alone. It meets the wall at the top, so the wall treatment matters.
If you plan panelling, align the panel lines with the cornice drop. The two then read as one design. Our wall panel design guide covers PVC, WPC, MDF, and wood options.
Soft accents help as well. A wind chime near a window adds gentle sound and movement under a calm ceiling line. Our wind chimes for home guide shares placement tips.
Keep the rest of the walls simple when the cornice is detailed. Let one element lead.
Step by Step Cornice Design Installation
Installation takes skill, but you should still understand the process. It helps you supervise the work.
- Measure each wall and add ten per cent for cutting waste.
- Mark the drop line on the wall and the spread line on the ceiling.
- Cut the corners at forty five degrees for neat joins.
- Fix the profile with adhesive and screws or nails.
- Fill the joints and gaps with a flexible filler.
- Apply primer, then two coats of paint.
A living room usually takes one to three days, including drying. Wiring for cove lights must finish before the plaster work starts. Tell your electrician early.
Common Cornice Design Mistakes to Avoid
Most problems come from rushed decisions. Watch out for these.
- Choosing a size without testing it on the wall.
- Using an ornate profile in a low ceiling room.
- Ignoring moisture in bathrooms and coastal homes.
- Skipping the flexible sealant at the joint.
- Picking a dark colour for a small room.
- Mixing styles that fight each other, such as classic leaves with sleek shadow gaps.
Fix these early. Repairs after painting cost far more than planning.
Cornice Design for Small Flats
- Many city homes have 8 or 9 foot ceilings. Space feels tight, so every inch counts.
- Choose a slim cornice design here. Keep the drop under four inches. Let the spread on the ceiling do the lifting.
- Stay with one light colour from wall to cornice to ceiling. This removes visual breaks and makes the room feel wider.
- Skip heavy carving in small rooms. A plain cove or a shadow gap gives the best result.
- Corner brackets and busy patterns also shrink a room. Keep the lines calm and continuous.
Budget Planning with a Real Example
Let us take a living room of 14 feet by 12 feet. The perimeter measures 52 running feet. Add ten per cent for waste, and you need about 57 running feet. Now compare the options.
| Material | Rate Used | Estimated Material Cost |
|---|---|---|
| POP | Rs 80 per ft | Rs 4,560 |
| Gypsum | Rs 140 per ft | Rs 7,980 |
| Polyurethane | Rs 250 per ft | Rs 14,250 |
Labour, painting, and cove lighting come on top. Ask for these costs in writing.
Use this sum as a starting point for your own cornice design budget. Then request a site visit for an exact quote.
Care and Maintenance
A cornice needs little care. Dust it with a soft brush every month. Wipe it gently with a dry cloth.
Fill new hairline cracks with flexible filler. Repaint every three to four years. In humid cities, use an anti fungal primer.
For wooden profiles, check for termites once a year. Polish them every few years.
Quick Checklist Before You Finalise
Run through this list with your designer or contractor. It takes five minutes.
- Have you measured the ceiling height in every room?
- Have you tested the paper strip on the wall?
- Does the profile match your furniture style?
- Is the material right for your climate?
- Will the electrician finish cove wiring before plastering?
- Have you chosen warm white lights and a dimmer?
- Did you ask about flexible sealant at the joint?
- Do you have written quotes for labour and paint?
Tick every box, and surprises on the final day become rare.
Is a Cornice Worth the Money?
For most homes, yes. The cost is modest compared with furniture or flooring. The visual change is large. A good cornice design also protects your paint from joint cracks. That saves money over time. Start with one room. Test the paper strip. See how the light behaves in the evening. Then extend the idea to the rest of your home.
Final Thoughts
The best cornice design does not shout. It finishes the room quietly, the way a good frame finishes a painting. Choose a profile that fits your ceiling height. Pick a material that suits your climate. Light it with warm tones, and size it with care. Do that, and you will keep looking up for all the right reasons.
FAQs on Cornice Design
1. What is the best material for a cornice in Indian homes?
Gypsum and polyurethane work well for most homes. Gypsum gives neat, uniform profiles. Polyurethane resists moisture, so it suits humid cities and bathrooms. POP is cheaper but cracks more easily.
2. How much does a cornice cost per running foot?
Costs range from about Rs 40 for basic POP to Rs 400 or more for polyurethane. Wood costs more. Rates depend on city, profile, and labour, so compare quotes.
3. Can I add a cornice to a room without a false ceiling?
Yes. A cornice fixes directly to the wall and ceiling junction. Check that both surfaces are clean and level. A good cornice design in a plain ceiling room still adds depth.
4. Does a cornice make a room look smaller?
A large cornice in a low room can. Choose a wider spread than drop to lift the ceiling. Light colours and a small profile also keep the room open.
